The Intake System is Sylva's universal ingestion layer — it lets you push content into your workspace from virtually anywhere, whether that's a script calling a REST API, an email you forward, a GitHub event, or a quick note you jot down on your phone.
API Key Management
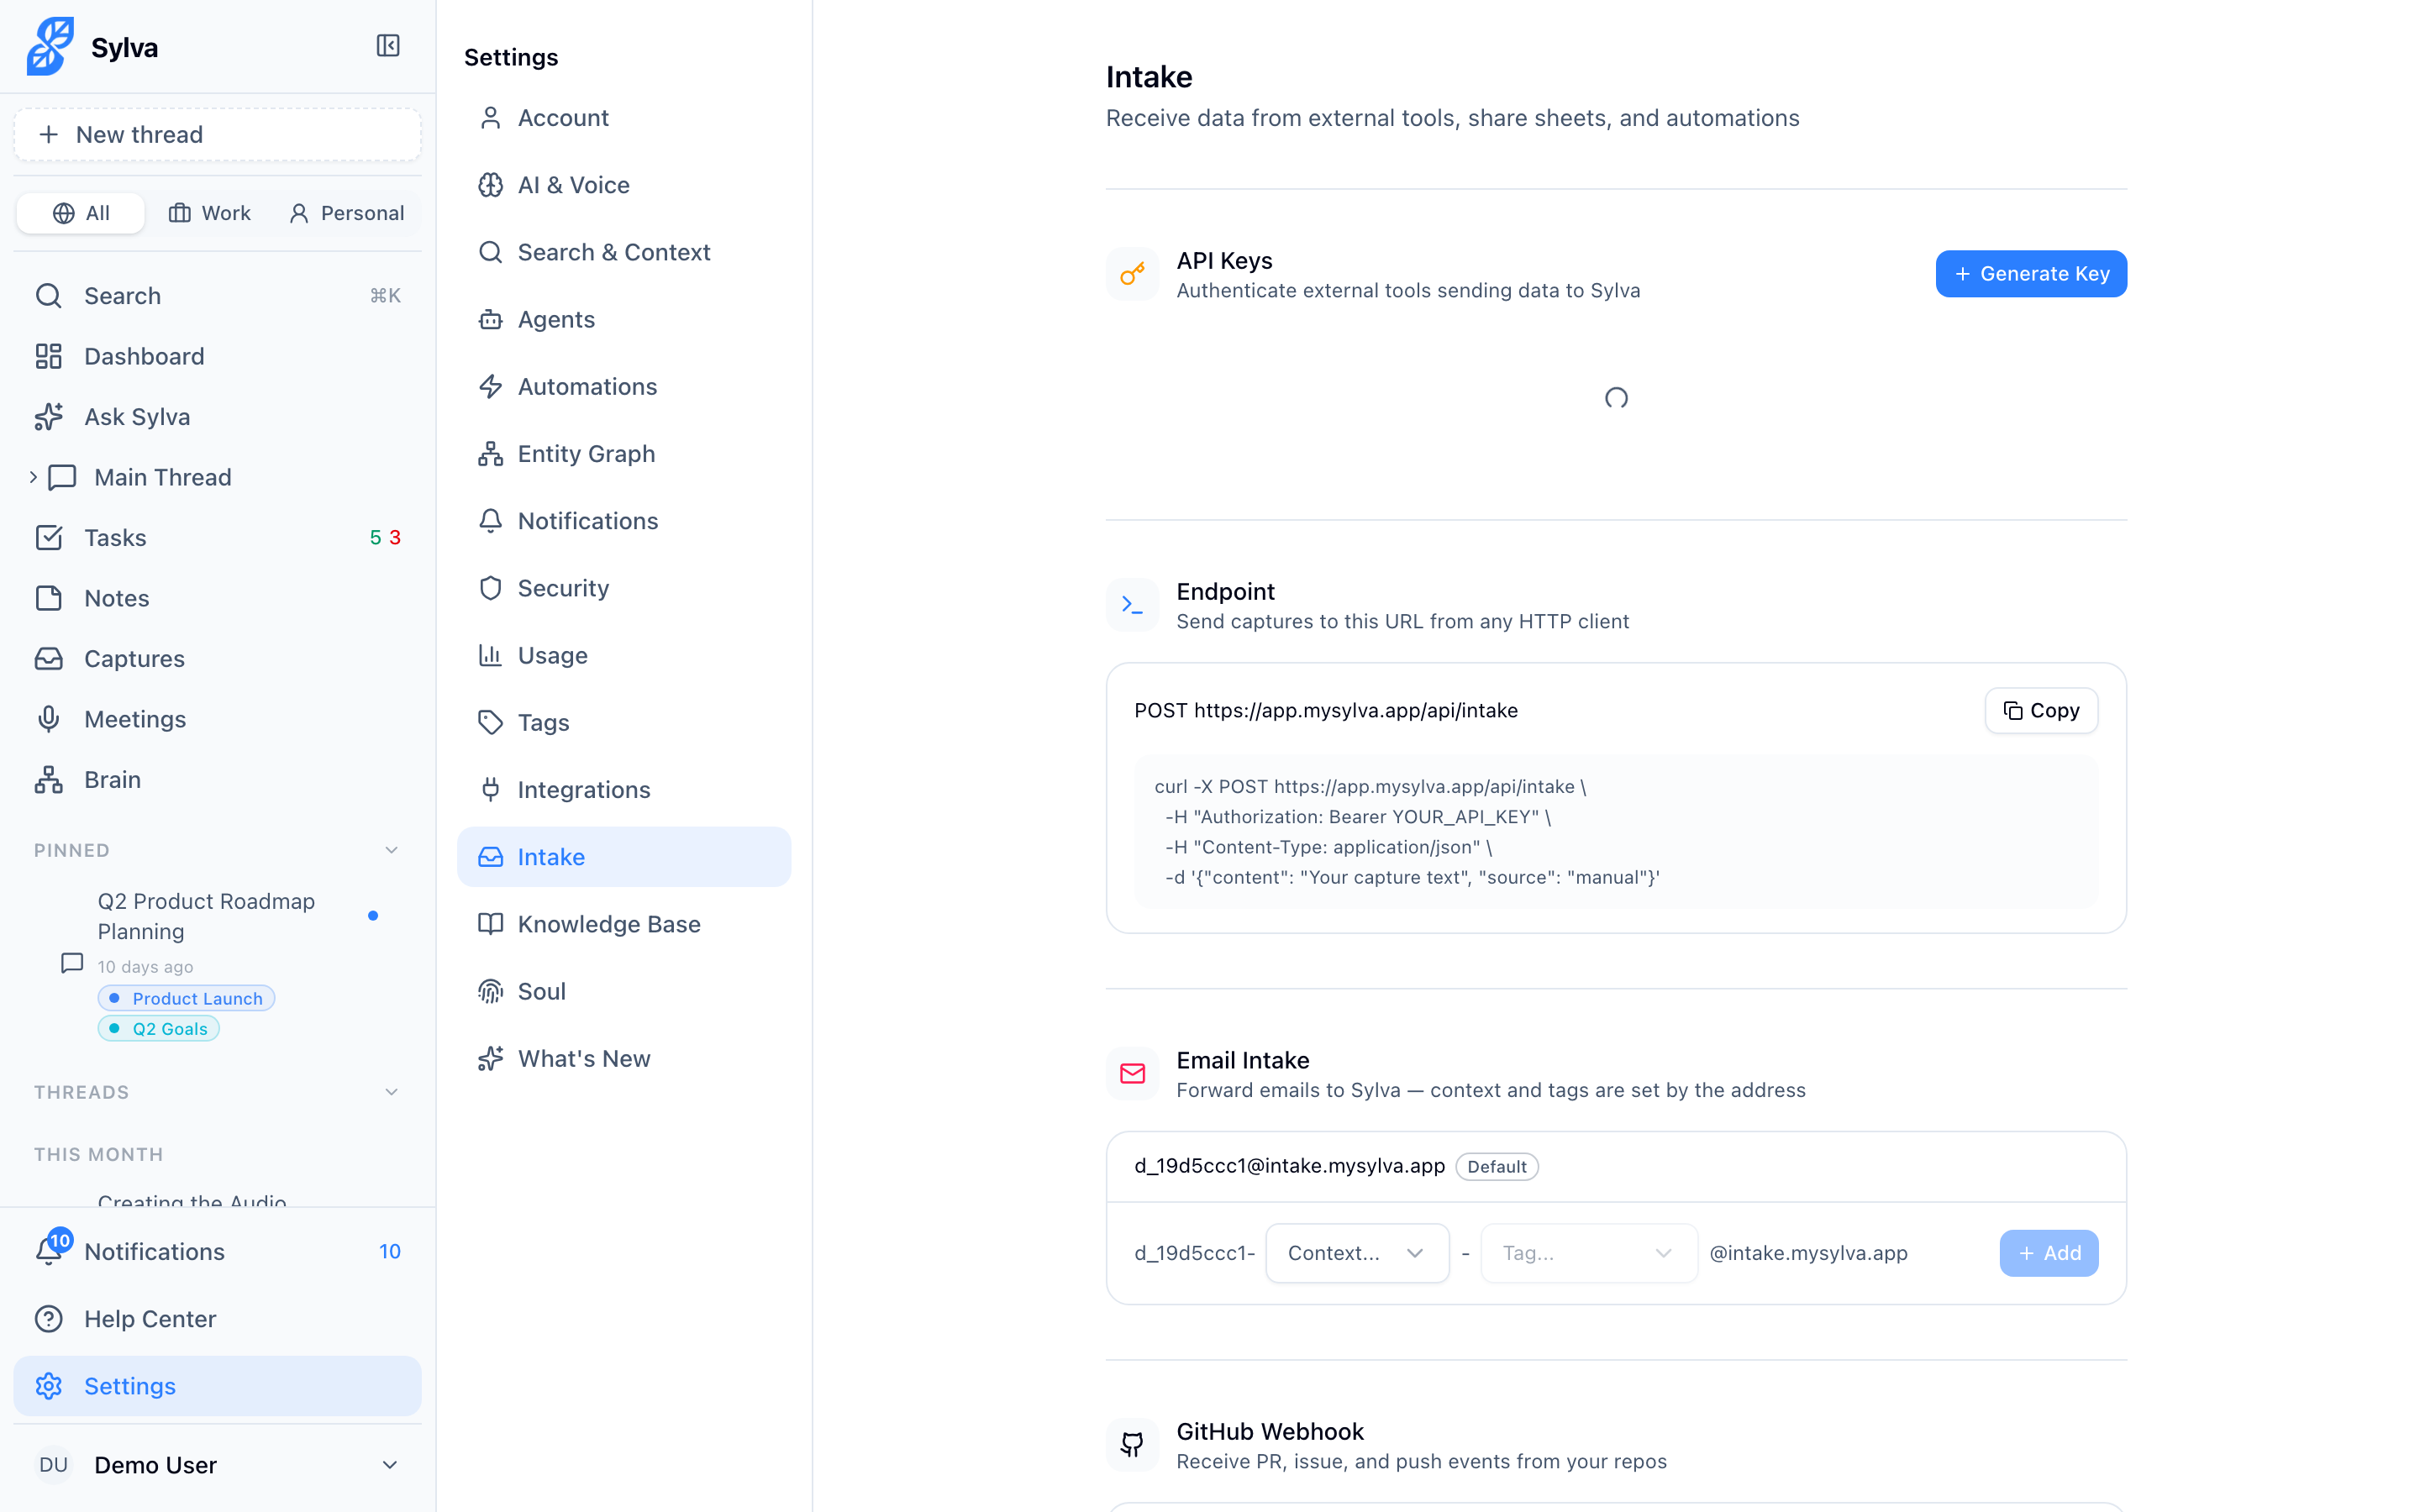
Every external request to the Intake API must be authenticated with an API key. You manage keys in Settings > Admin.
- Open Settings > Admin and scroll to the Intake API section
- Click Generate API Key
- Copy the key immediately — Sylva displays it only once
- Store the key somewhere secure (a password manager or environment variable)
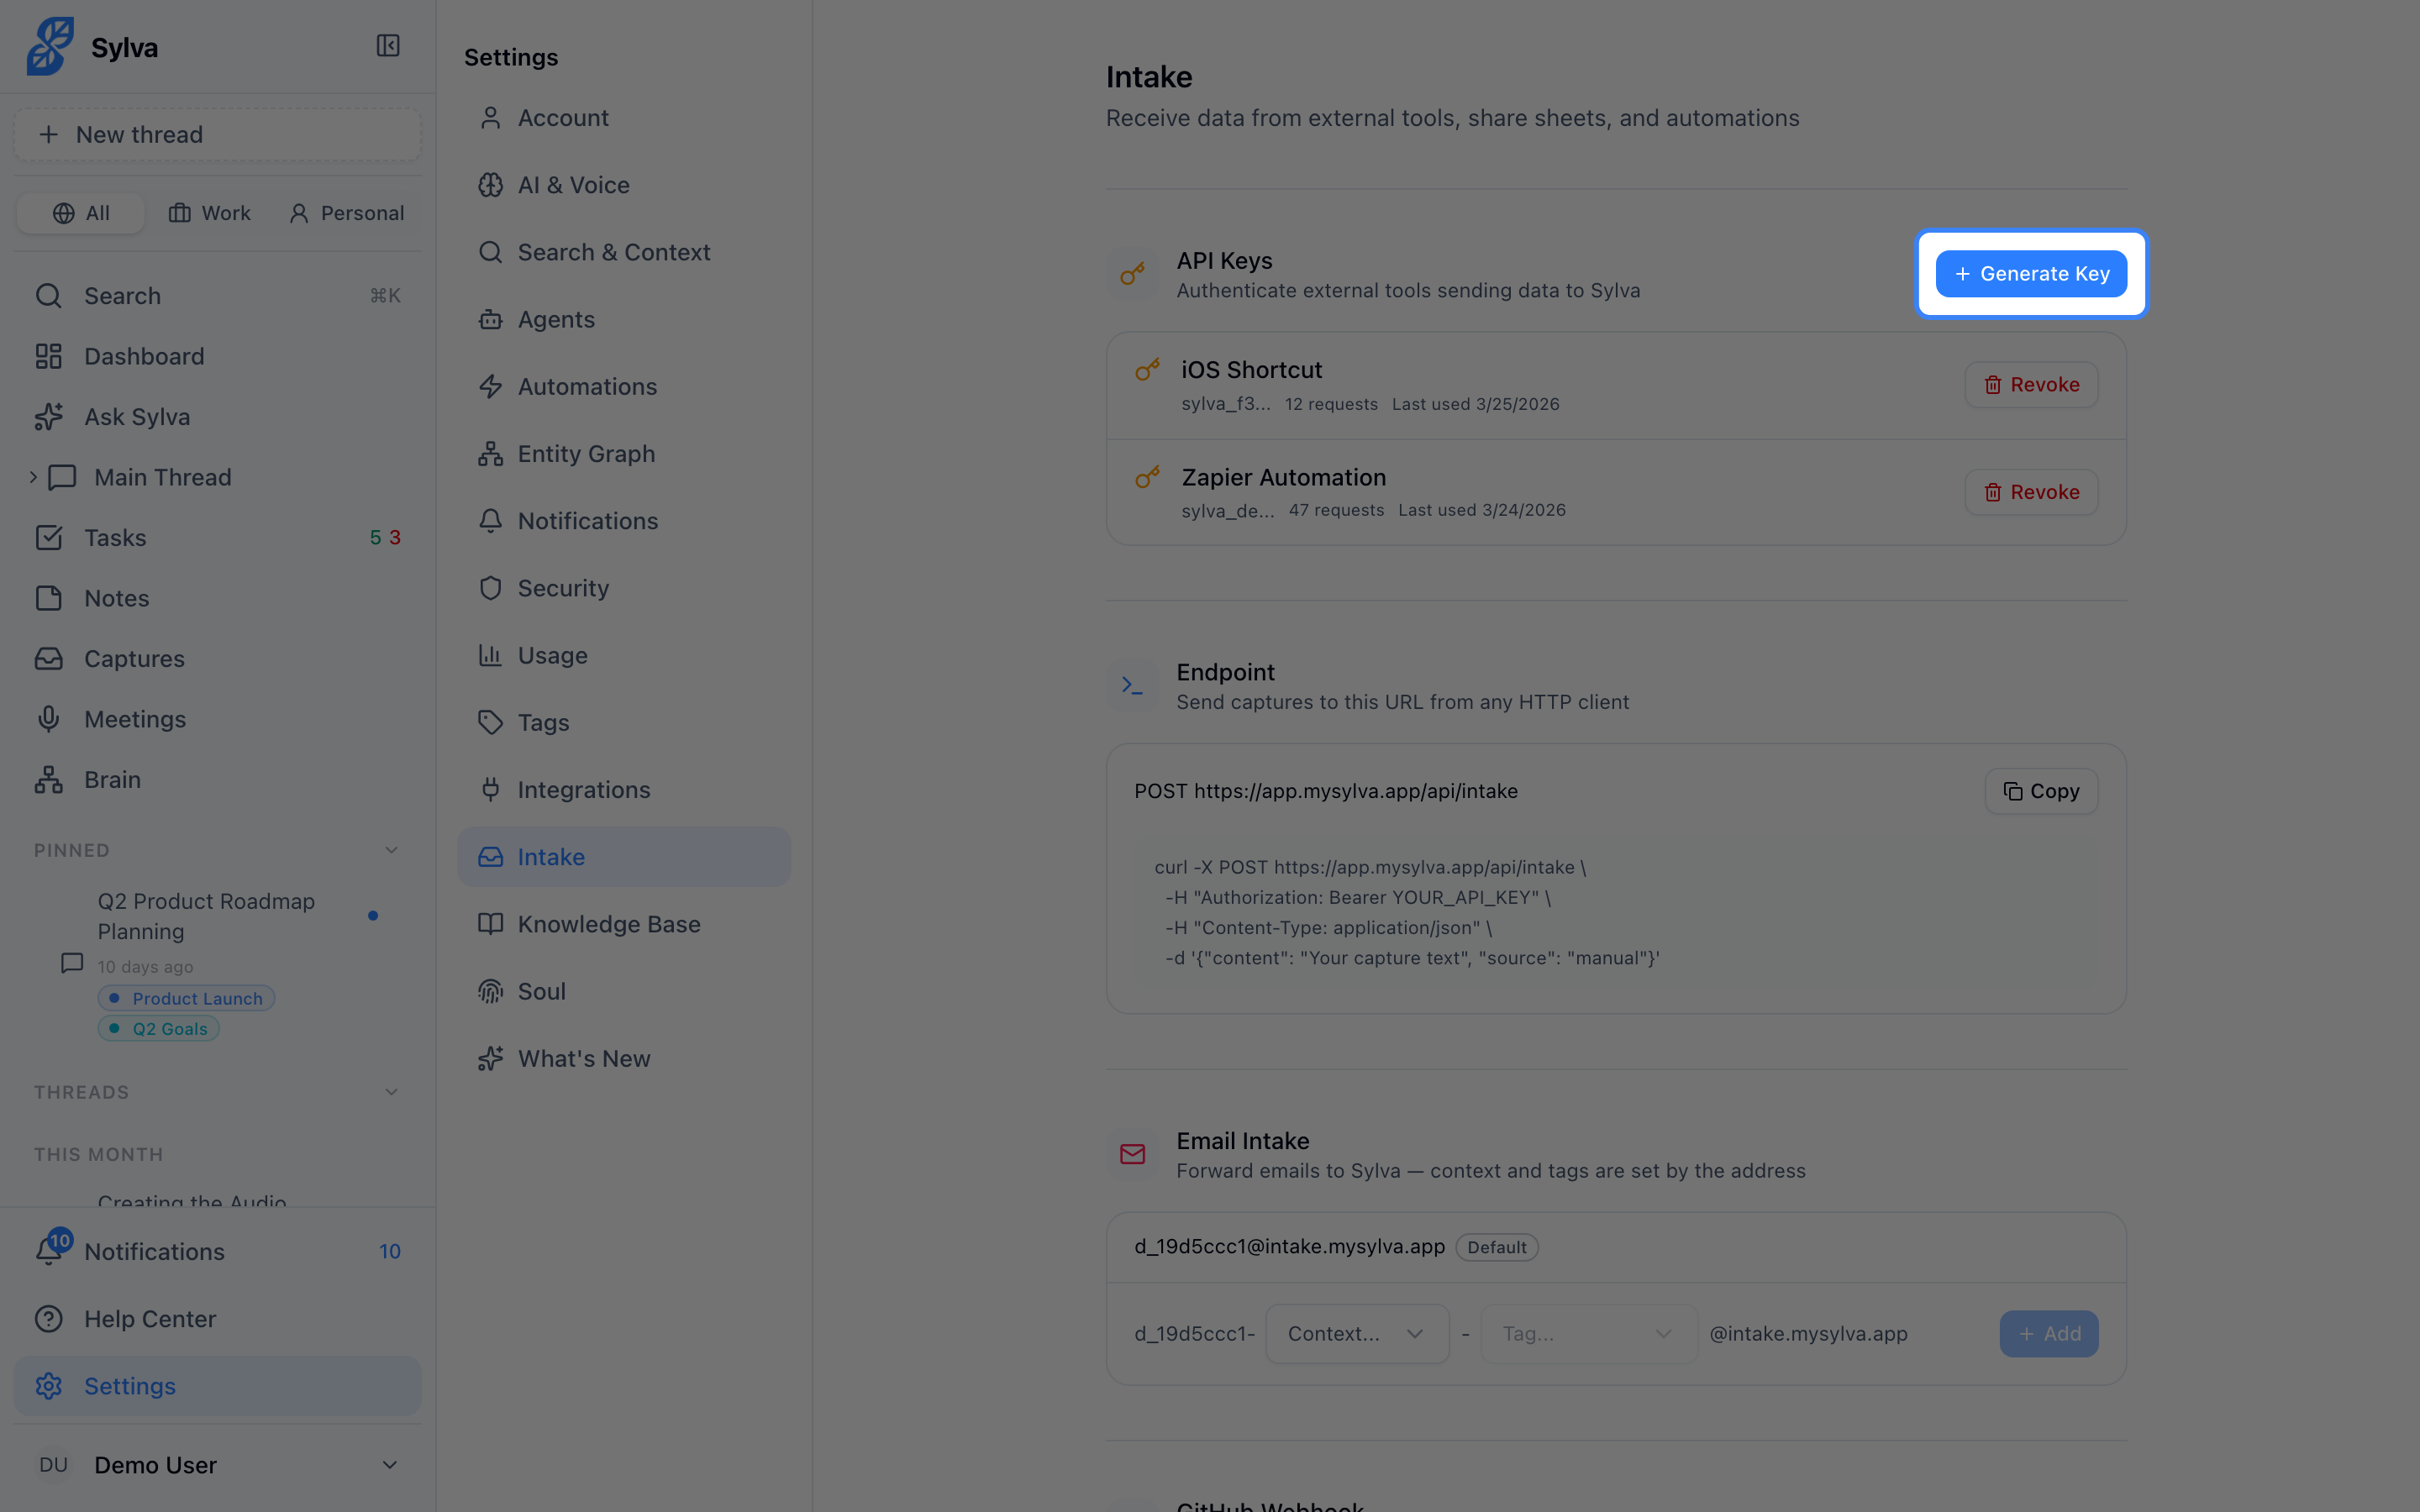
You can have multiple active keys — useful if you want separate keys for different services or scripts. Revoke any key at any time from the same section; revoked keys stop working instantly.
REST API Endpoint
The primary way to push captures programmatically is the REST endpoint:
POST https://app.sylva.ai/api/intake/captures
Headers:
Authorization: Bearer YOUR_API_KEYContent-Type: application/json
Request body:
{
  "captures": [
    {
      "source": "slack",
      "title": "Design review follow-up",
      "content": "We agreed to finalize the new dashboard layout by Thursday.",
      "source_url": "https://slack.com/archives/C01ABC/p1234567890",
      "context": "work",
      "captured_at": "2025-01-15T14:30:00Z",
      "metadata": {
        "channel": "#design",
        "author": "maria@example.com"
      }
    }
  ]
}
Curl example — single capture:
curl -X POST https://app.sylva.ai/api/intake/captures \
  -H "Authorization: Bearer sk_intake_abc123" \
  -H "Content-Type: application/json" \
  -d '{
    "captures": [{
      "source": "cli",
      "content": "Book flights for the NYC offsite — March 10-12",
      "context": "work",
      "captured_at": "2025-01-15T09:00:00Z"
    }]
  }'
Curl example — multiple captures in one request:
curl -X POST https://app.sylva.ai/api/intake/captures \
  -H "Authorization: Bearer sk_intake_abc123" \
  -H "Content-Type: application/json" \
  -d '{
    "captures": [
      {
        "source": "slack",
        "title": "Budget approval",
        "content": "CFO approved the Q2 marketing budget.",
        "context": "work",
        "captured_at": "2025-01-15T10:00:00Z",
        "metadata": { "channel": "#finance" }
      },
      {
        "source": "note",
        "content": "Pick up prescription after work",
        "context": "personal",
        "captured_at": "2025-01-15T10:05:00Z"
      }
    ]
  }'
A successful request returns 201 Created with a summary of what was ingested.
Supported Capture Fields
Each object in the captures array accepts these fields:
- source (required) — Identifies where the content came from. Common values:
slack,email,github,manual,cli,note,web. You can use any string - content (required) — The body text of the capture
- title (optional) — A short label for the capture
- source_url (optional) — A link back to the original content
- context (optional) —
"work"or"personal". Defaults to"work" - captured_at (optional) — ISO 8601 timestamp of when the content was originally created. Defaults to the time Sylva receives it
- metadata (optional) — A JSON object for any extra data you want to attach (author, channel, tags, etc.). Sylva stores it and makes it searchable
Quick Capture
For those moments when you want to get something into Sylva without writing code, use the Quick Capture page.
- Navigate to /capture or tap the Quick Capture shortcut on mobile (available from your home screen if you've installed the PWA)
- Type your content in the Content field — this is the only required field
- Optionally add a Title and click Add URL to attach a source link
- Toggle the context between Work and Personal
- Press Save — or hit Ctrl+Enter (Cmd+Enter on Mac) for a keyboard shortcut
Quick Capture also works as a mobile share target. On Android, share a link, text, image, or PDF from any app and choose Sylva — the content flows directly into your workspace.
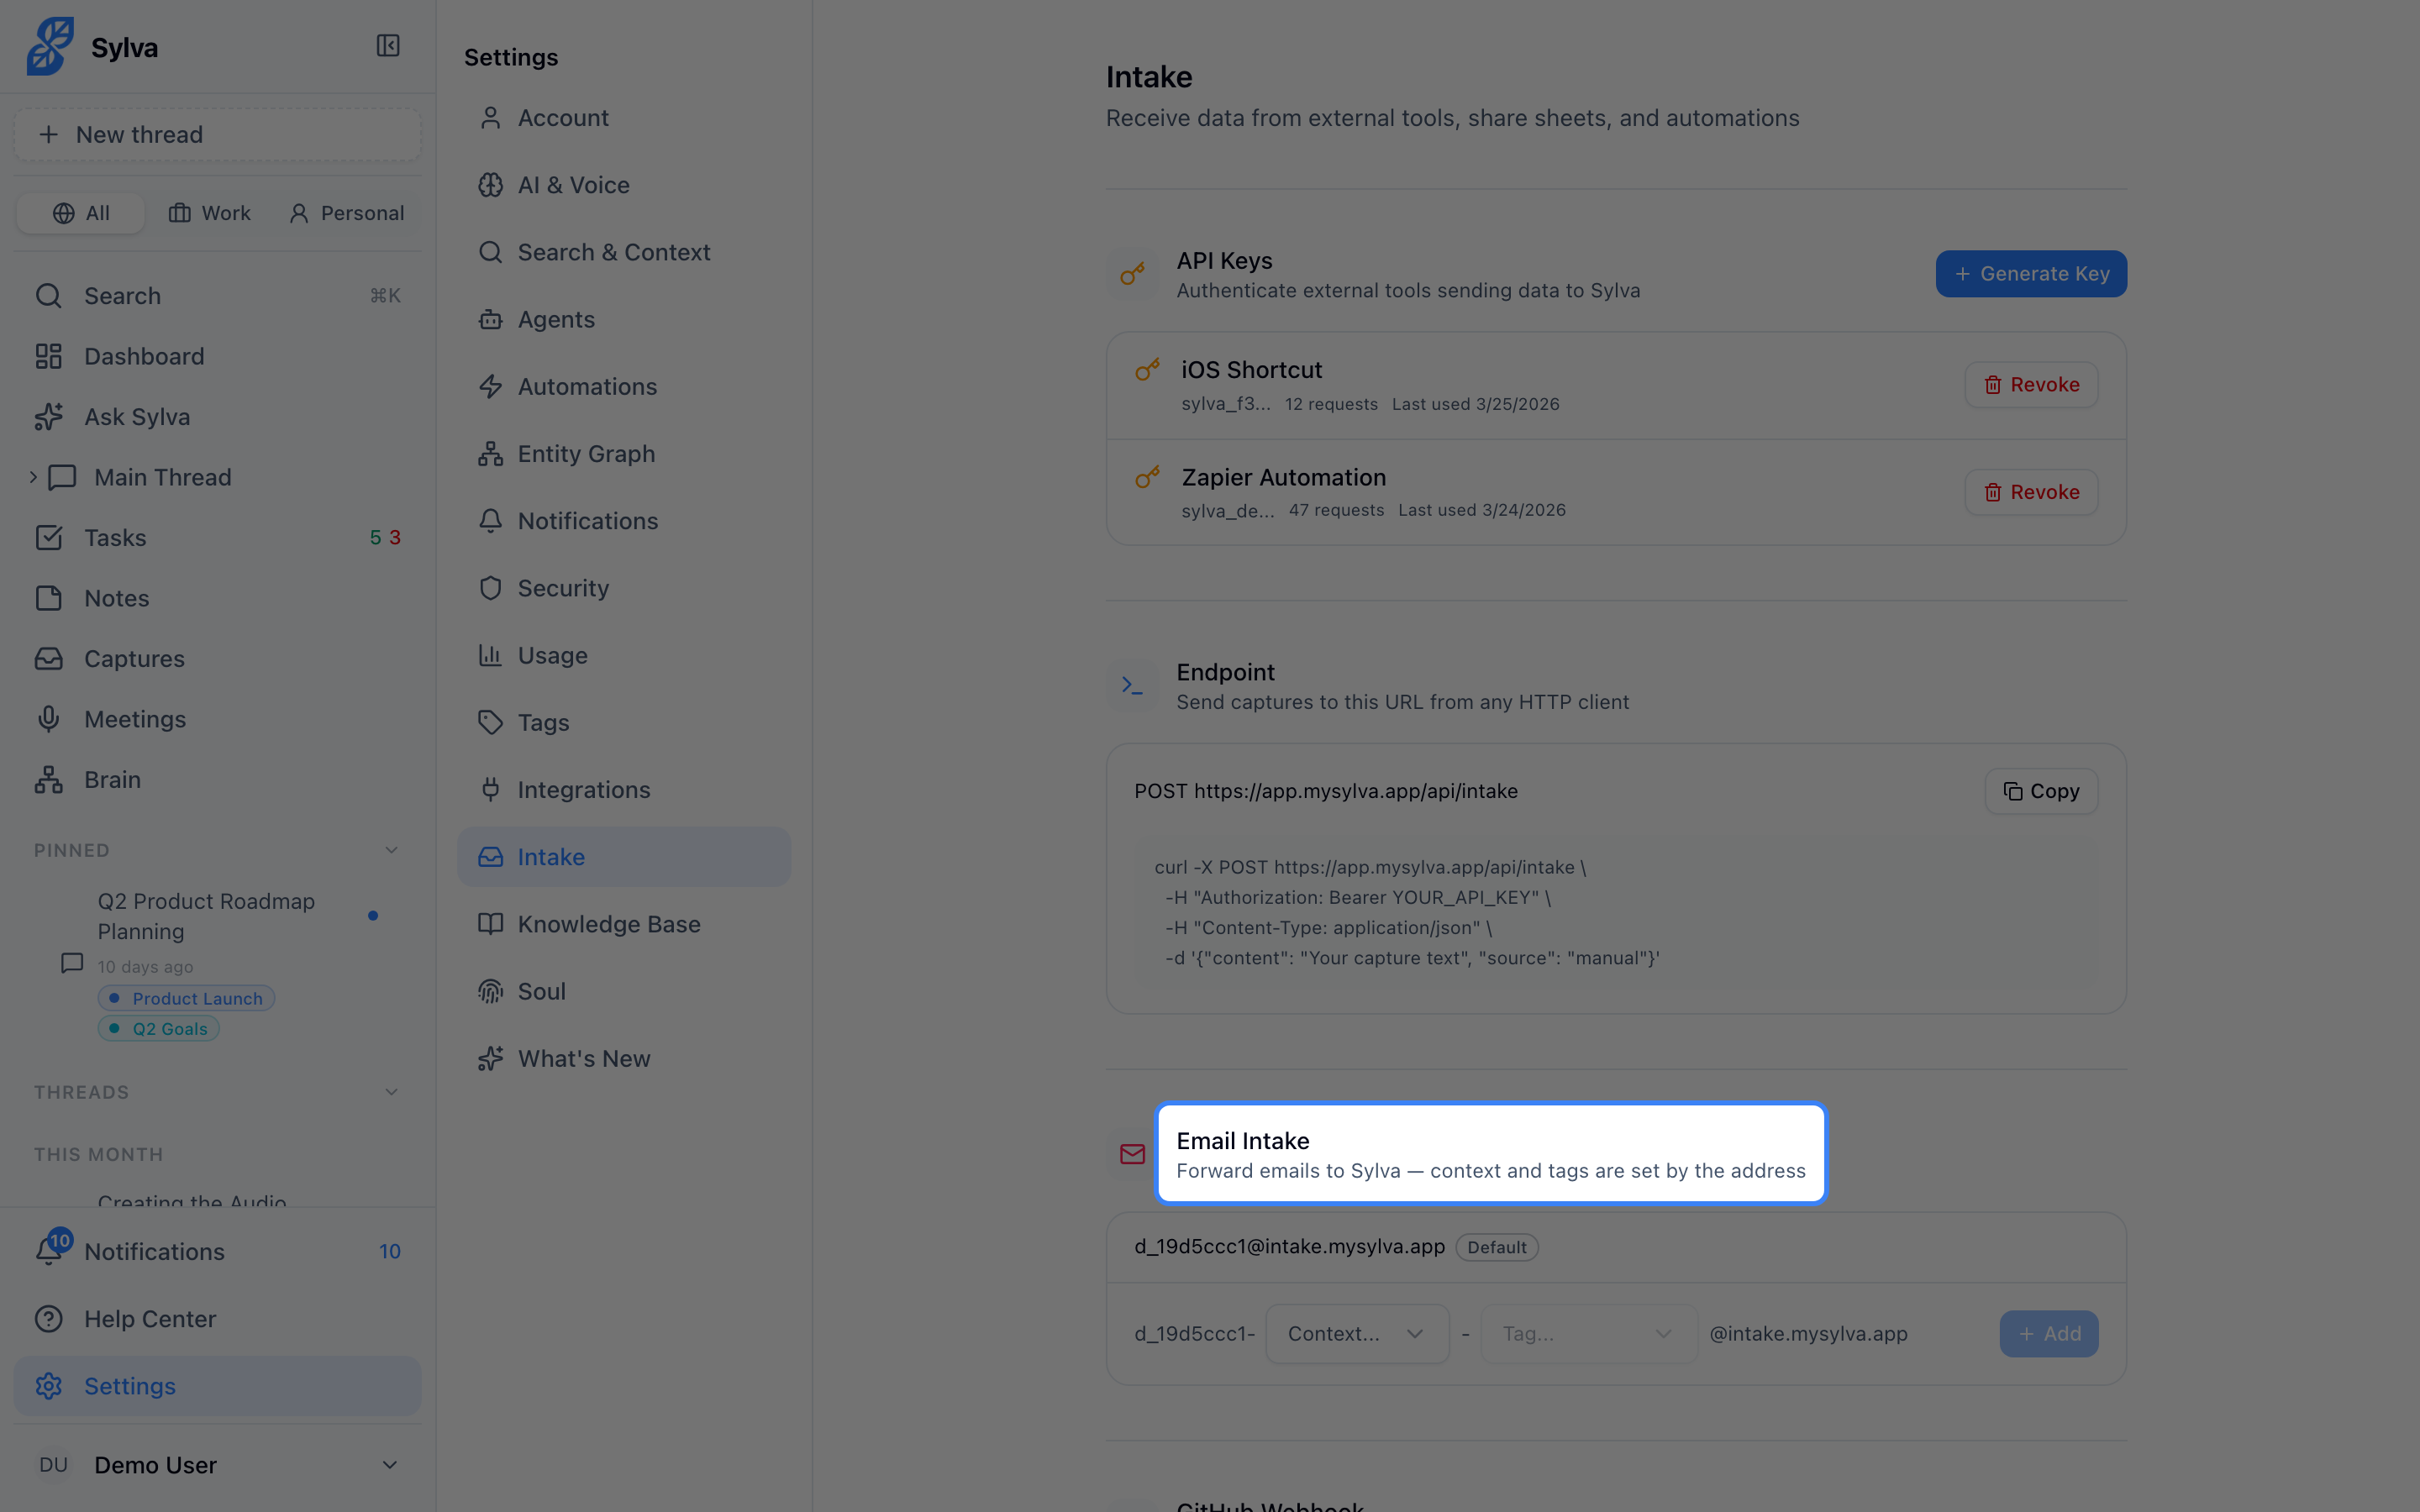
Email Intake
Every Sylva account gets a unique intake email address. Forward any email to it and Sylva ingests the subject line as the title and the email body as the content.
- Go to Settings > Integrations and find the Email Intake section
- Copy your unique intake address — it looks something like
intake-a1b2c3@in.sylva.ai - Forward any email to that address
This works well for:
- Forwarding a confirmation email you want to reference later
- Sending yourself notes from an email client that's already open
- Setting up automated forwards from a shared inbox or mailing list
Sylva preserves the sender, subject, and timestamp as metadata so you can trace back to the original message.
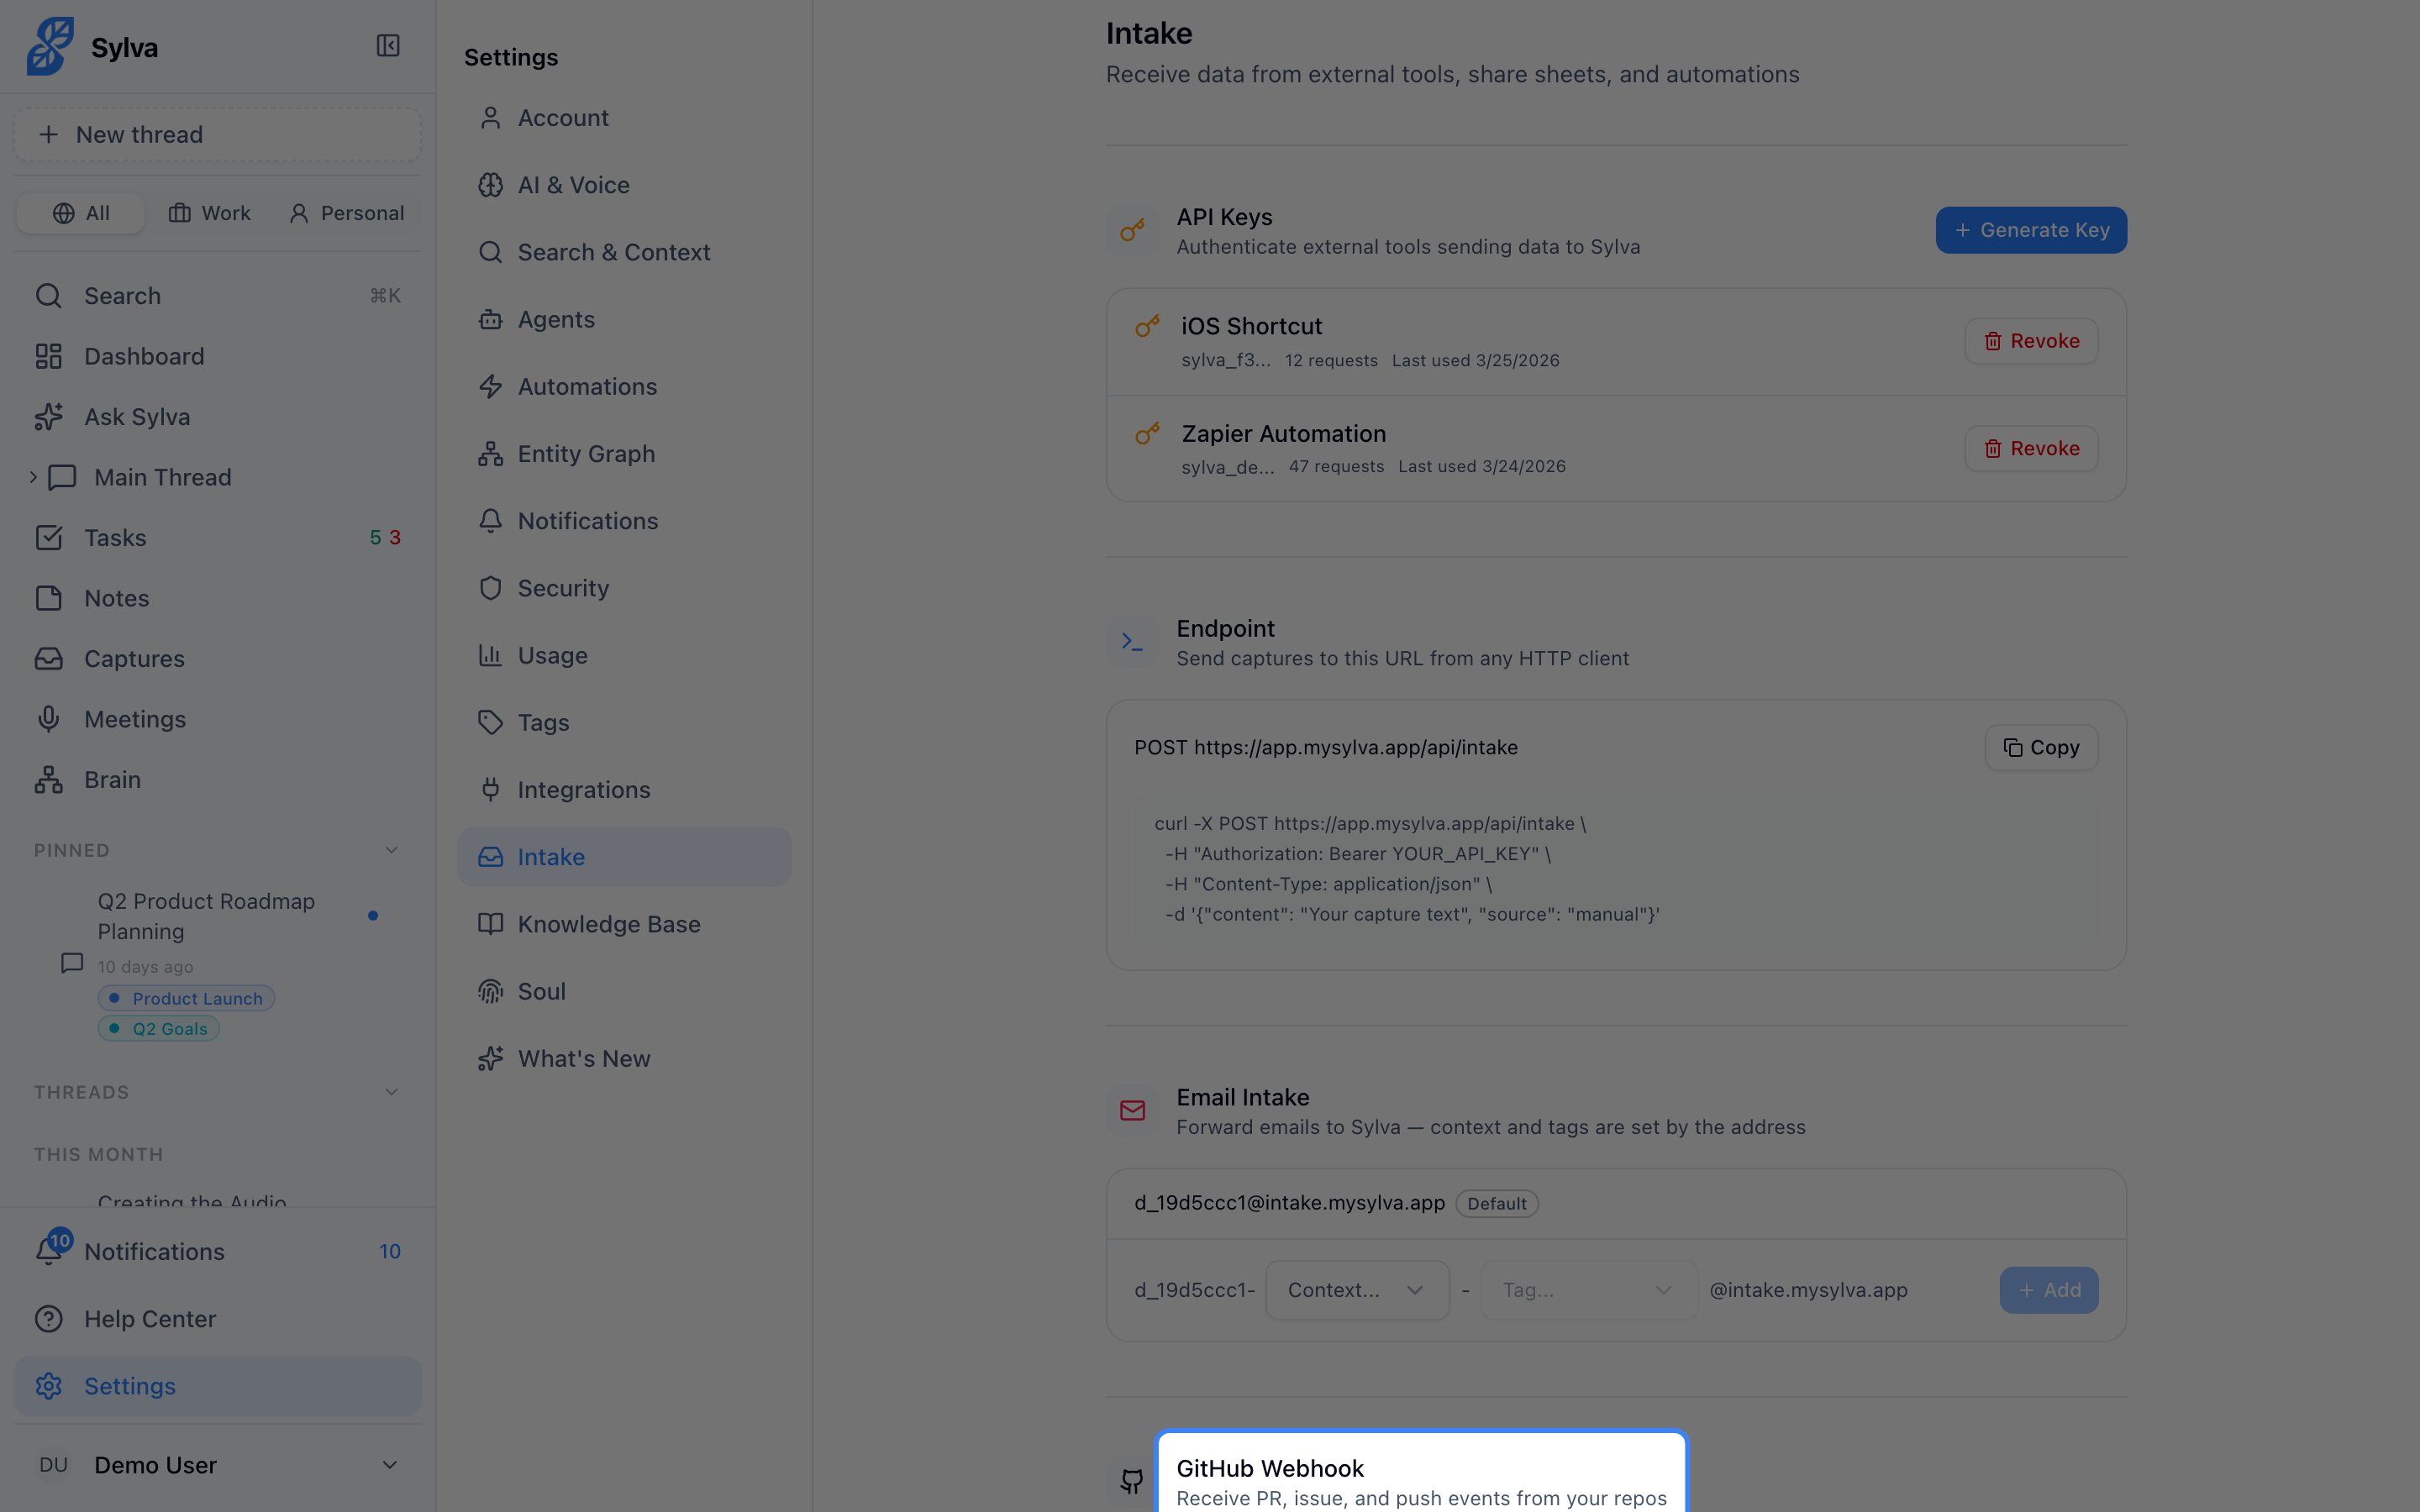
GitHub Webhook Integration
Connect a GitHub repository to automatically capture pull request activity, issues, and push events.
- Go to Settings > Integrations and find the GitHub Webhooks section
- Copy the webhook URL and the webhook secret
- In your GitHub repository, go to Settings > Webhooks > Add webhook
- Paste Sylva's webhook URL into the Payload URL field
- Set Content type to
application/json - Paste the webhook secret into the Secret field
- Under Which events would you like to trigger this webhook?, select the events you care about

Supported GitHub events:
- Pull requests — Opened, closed, merged, review requested
- Issues — Opened, closed, commented
- Push events — Commits pushed to a branch
Each event lands as a capture with structured metadata (repo name, author, branch, PR number, etc.), so you can search for it later using natural language — "What PRs did Alex merge last week?"
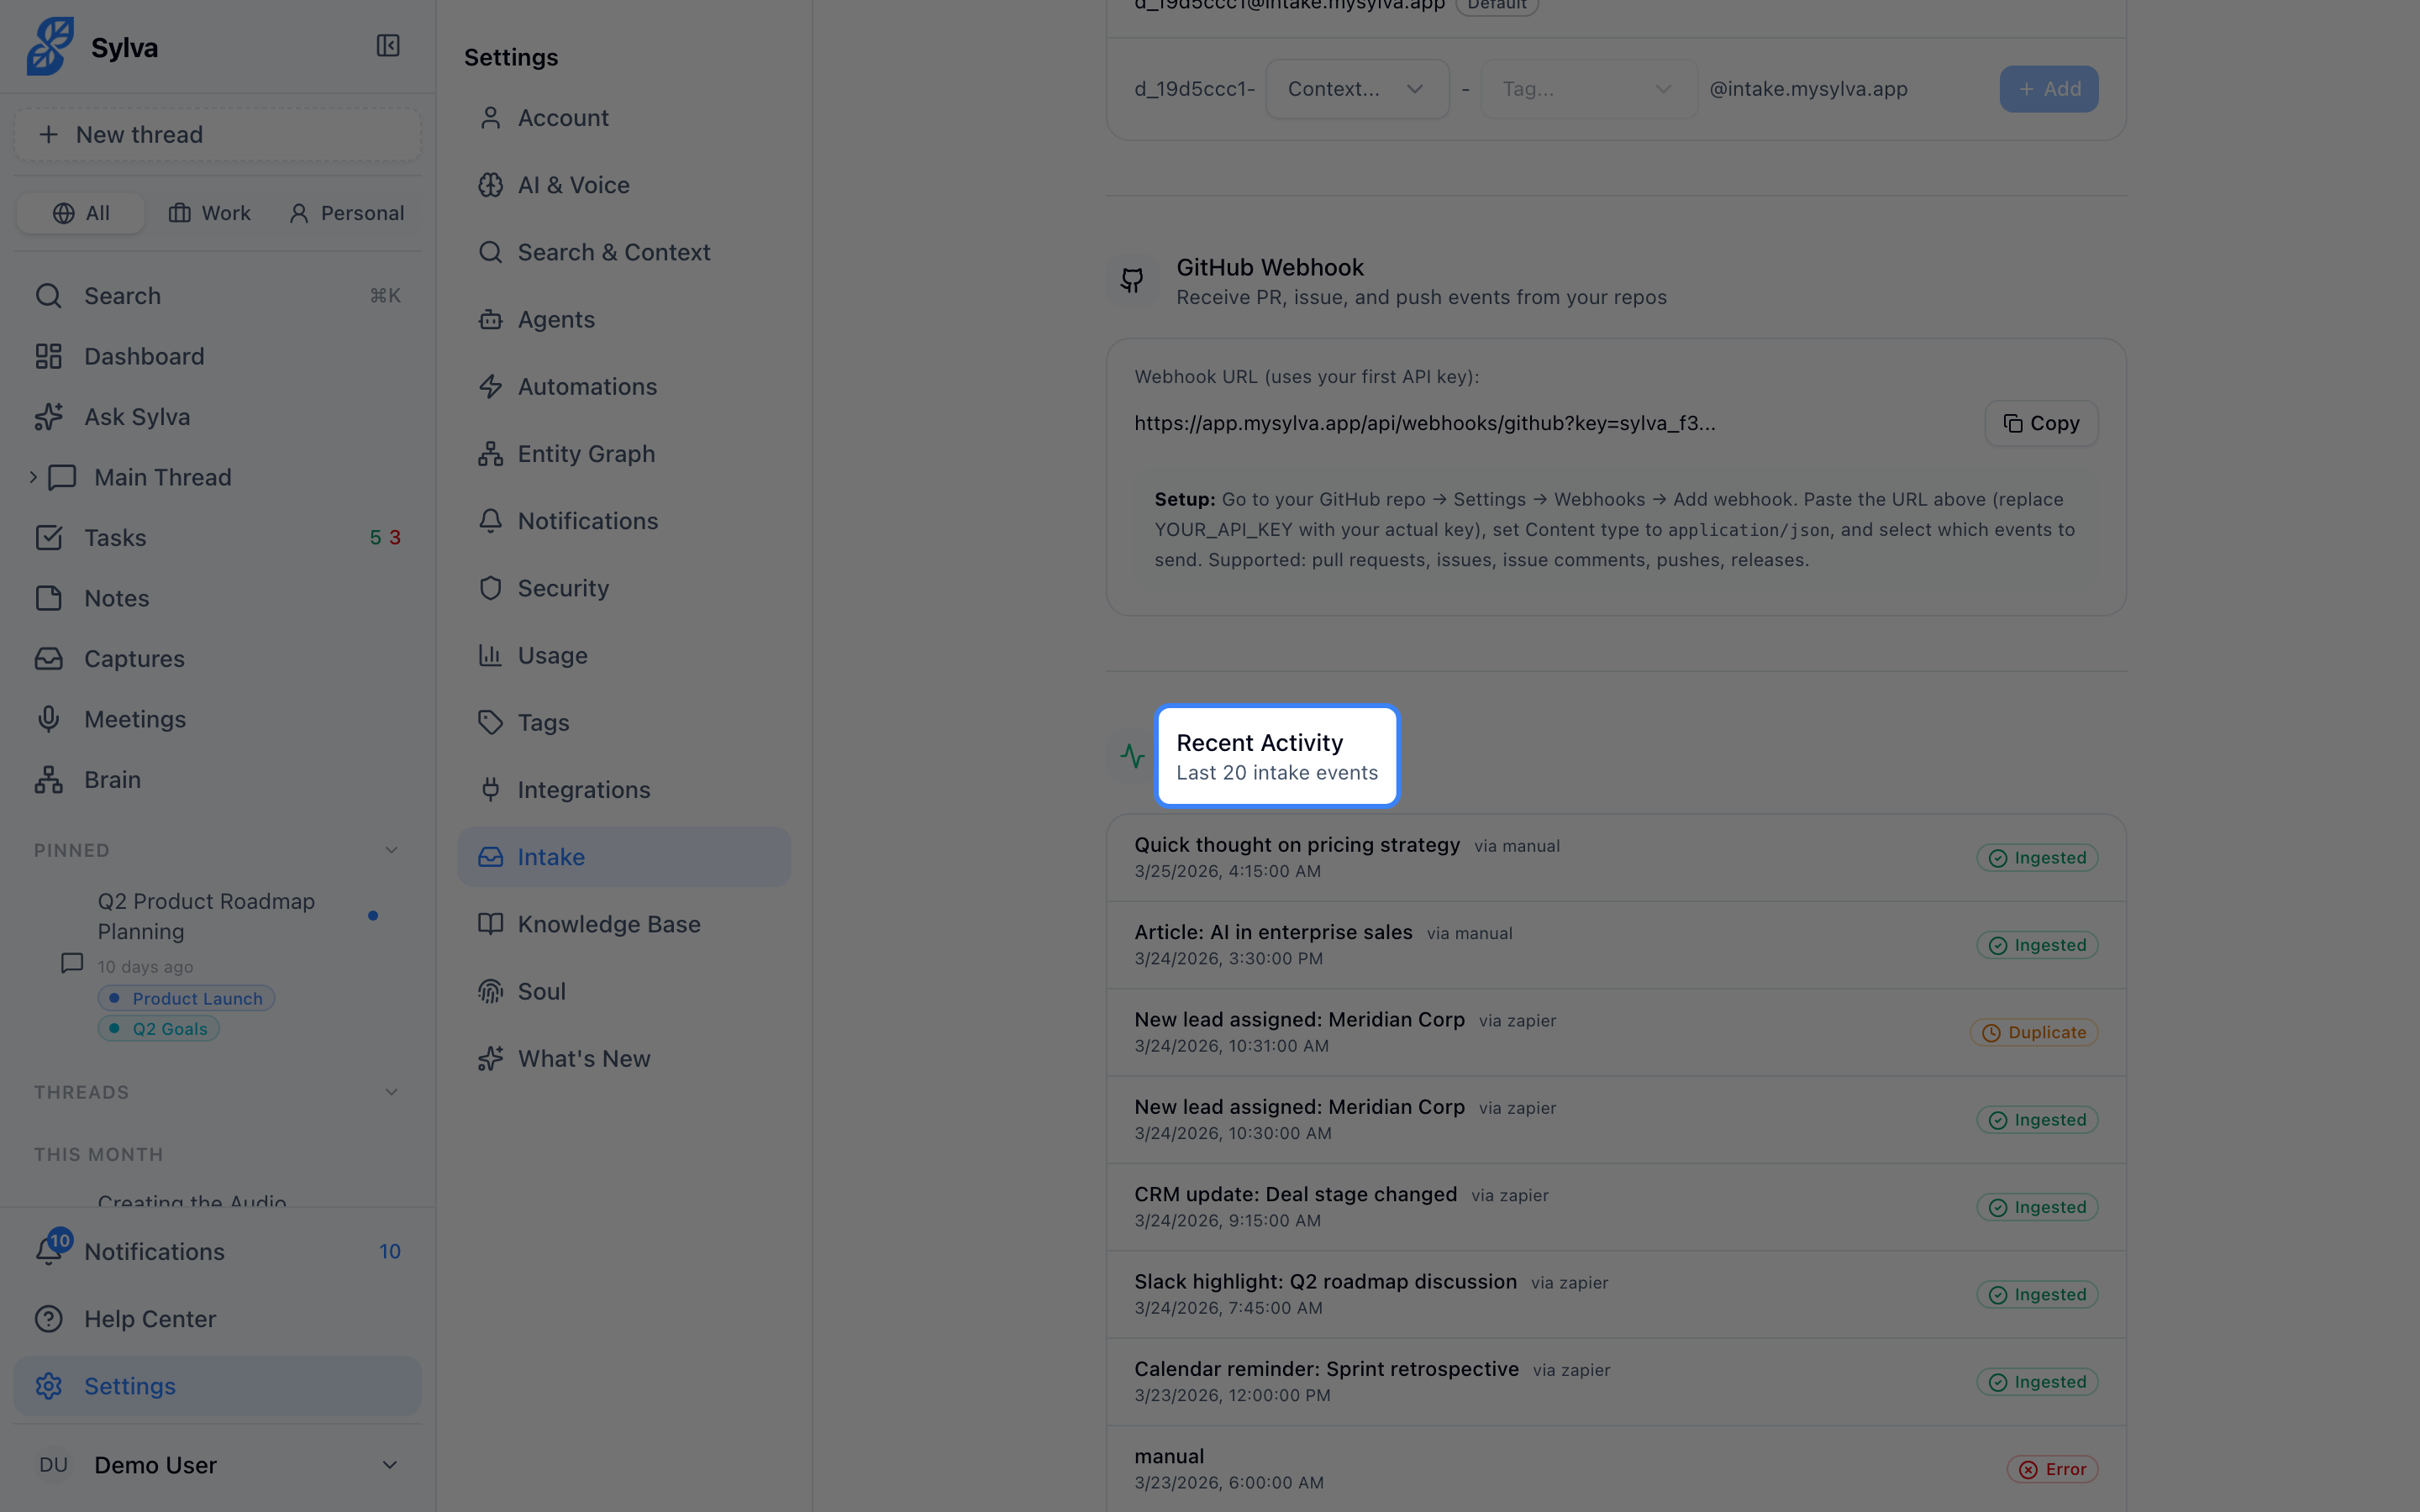
Intake Activity Log
The activity log gives you a chronological view of everything that has been ingested, regardless of source. Find it in Settings > Admin under Intake Activity.
Each entry shows:
- The source (API, email, GitHub, manual, etc.)
- A timestamp for when the capture arrived
- A preview of the content
- The status — whether it was processed successfully, deduplicated, or failed
Use the activity log to verify that an integration is working or to diagnose why a capture didn't appear where you expected it.
Deduplication
Sylva automatically detects and handles duplicate captures. If the same content arrives twice — because an email was forwarded again, a webhook fired twice, or a script ran more than once — Sylva identifies the duplicate and skips reprocessing it.
Deduplication is based on a combination of source, content hash, and timestamp. When a duplicate is detected:
- The original capture is kept as-is
- The duplicate is logged in the activity log with a Deduplicated status
- No duplicate entries appear in your workspace
This means you don't need to build deduplication logic into your own scripts or worry about webhook retries creating noise.
Rate Limiting
The Intake API enforces rate limits to keep the system stable:
- 60 requests per minute per API key
- 100 captures per request (in the
capturesarray)
If you exceed the rate limit, the API returns a 429 Too Many Requests response with a Retry-After header indicating how many seconds to wait. Most HTTP clients and libraries handle this automatically.
For bulk imports or migrations, break your data into batches of 100 captures per request and space requests a second or two apart. This comfortably stays within the limit while still moving data quickly.